
It’s a beautiful day outside, and you can’t help but feel this need to venture on the road as soon as possible. You grab the keys to your jeep and head over to the garage only to realize the hardtop is going to block out the weather!
This is where your knowledge of at home hard top removal comes into play. You may have heard people say that they’ve removed the top all by themselves with no assistance or help, but that’s hardly ever the case.

Why you shouldn’t do it all by yourself:
Yes, we’ve all seen DIY videos of people showing off their skills of solo, hardtop removals, making it look easy as ever, but the reality couldn’t be further from what they’re convincing you to do.
Removing the hard-top looks easy, but it’s more difficult than the DIY enthusiasts would care to admit. It is highly recommended that you do it with a helping hand there to support you.
This is to ensure that you don’t hurt the expensive hard top of your ride or, more importantly, you don’t hurt yourself.
Either way, just because something can be done doesn’t mean you should do it.
Removing the hardtop if you’ve got a helping hand:
With this step by step breakdown of the entire procedure, you’ll be ready to face the tides of wind in no time!
Step 1:
Start by finding the latches on the front panels of the hardtop from inside the vehicle. For many jeeps, they’ll be located below the sun visors. So, you might need to pop those out if you can’t see them.
Step 2:
Unhook the latches from either the driver side or the passenger side. This depends on the model of your jeep, but conventionally, whichever side has the smaller component of the hardtop should be removed first.
Step 3:
Once you’ve unhooked all the latches from the front panels of the hardtop’s front section, you’ll be able to easily lift them up and remove them. Again, remove whichever component of the front section of the hardtop is smaller.
No help or assistance may be required until this point for most jeeps.
Step 4:
Now that the front section is taken care of let’s move on to the rear section of the hardtop. Most models will have these bolted into the jeep’s frame. Find the appropriate screwdriver for the bolts on your jeep and unscrew them one by one.
Step 5:
Remove the electrical connection from the hardtop’s rear section. All sorts of electrical connections need to be disconnected. Including the viper connection for the back windshield!
Step 6:
Now, this is crucial. Remember, at the start; we said you might require assistance? This is the time to shine for that acquired hand.
Do not remove the rear section of the hardtop by yourself. Grab a friend and hold on to each side of the rear section as you safely remove it and place it down onto your garage floor.
Step 7:
Enjoy the open winds and the feisty ride!
Re-attaching the hardtop:
If you want to re-attach the hardtop, just reverse the process. Remember to go vice versa for the front section placement in step three.
What this means is, start off by putting back the larger component of the front section before latching in the smaller component.
This maximizes efficiency and will keep the front section of your panels and latches from being damaged.
Removing the hardtop without a helping hand:
There might be a good number of you out there who might not be able to acquire assistance or a helping hand. How would you go about removing the hardtop of your ride?
No worries, we’ve got the answer. You can opt for a hardtop hoist or a mount if you’re in the mood for a solo venture!
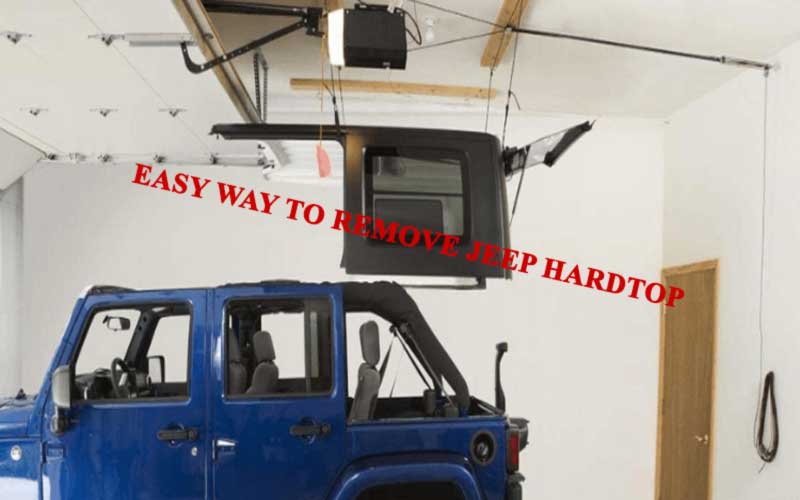
What’s a hoist:
A hoist is basically a stand with a hook inside that latches on to a belt. All of this equipment will come as a package with the hoist.
The belt that the hoist’s hook latches on to can be mounted and attached to both the front or the back ends of the hardtop.
Most hoists will come with a rotating stabilizer in the middle of the connection of the front legs. This stabilizer is a screw that can be rotated and fixed to the ground for extra stability.
After you’ve ensured stability and the strength of the belt that the hardtop will latch on to, go ahead with the removal.
Using a hoist to remove the hardtop:
From step 5 onwards of the above-mentioned method, follow through with the below procedure in case you can’t find assistance or if you just wish to do it yourself.
Step 1:
After the rear section is unscrewed, insert the bolts given with the hoist into the rear hardtop’s empty bolt spaces. Attach the bolt spaces to the straps of the belt that we will attach to the hook later on.
Step 2:
Attach the hook of the hoist to the belt on which the hardtop is mounted. Make sure the connection is firm and strong from both the hook to the belt and from the belt to the hardtop before you proceed with the next step.
Step 3:
Rotate the lever on the hoist slowly as you watch the massive hardtop rise from its original position. Keep rotating until the hardtop is at a reasonable height above the jeep’s edges.
Step 4:
Once the hardtop is as high as you can take it, viola! You’re done and ready to drive off into the escapade!
Our Recommendation:
Although we’ve provided you with details regarding both the methods of removing a hardtop, the technical aspect of the hoist method is what generally makes it a poor choice. Try doing it with a friend instead of as the method is much more convenient.
People are more willing to help than you might think. Besides, you’ll never know until you ask. Who knows, maybe that friend will tag along with you on your summer/spring drives!
Conclusion
This is exactly how to remove a jeep hardtop. We have shown only 9 simple steps, so that should not be anything hard. When removing the bolts, make sure you keep them in order and safe. I hope it helps.

