
How To Remove A Jeep Hardtop – Complete Step‑By‑Step Guide
The crack was so loud, my neighbors came running. There I was, standing next to my Jeep with a spider-webbed rear window and my buddy looking like he’d seen a ghost. “I thought you said you’ve done this before,” he muttered. That was my first hardtop removal – a $600 lesson in why you don’t wing it.
After 15 years as a Jeep tech and helping remove literally thousands of hardtops, I’ve seen every possible mistake. Cracked windows, damaged paint, thrown-out backs, and yes, even a hardtop that rolled off a roof and crushed a motorcycle (not mine, thankfully). Let me save you the pain and show you the right way to remove your Jeep hardtop.

Quick Answer
- Tools: Torx T50 for hardtop bolts (use the Jeep kit), soft towels, a helper or a hoist.
- Steps:
- Turn the Jeep off. Remove Freedom Panels (if equipped).
- Open tailgate. Unplug the rear wiper/defroster harness and disconnect the washer hose (driver‑side rear).
- Remove T50 bolts along the tub rails (usually 6 on 4‑door; fewer on 2‑door).
- With a helper or hoist, lift straight up, then back. Don’t twist.
- Store upright on a padded stand/cart. Never rest on the rear glass.
- Reinstall: Lower straight down, hand‑start all bolts, snug evenly, reconnect harness/hose, then leak‑check with a gentle hose.
Before You Start: Tools, Safety, Setup
- Tools you actually need
- Torx T50 bit (hardtop bolts)
- Ratchet with short extension (the factory Jeep tool kit works)
- Painter’s tape or towels (to protect paint/edges)
- Moving blankets or foam blocks
- Optional: penetrating oil (for older JK bolts), step stool
- Safety gear
- Work gloves
- Safety glasses
- Closed‑toe shoes
- The helper rule
- Two people are best. It’s not just heavy—it’s awkward. A rated hoist makes safe solo removal possible.
- Weather check
- Pick a calm day. Wind turns a hardtop into a sail. Ten mph gusts can flip a top off sawhorses.
How Much Does the Top Weigh? (so you plan the lift)
- Wrangler 2‑door rear shell: about 90–120 lb
- Wrangler 4‑door rear shell: about 120–150 lb
- Gladiator JT rear shell: about 130–170 lb
- Freedom Panels: light enough to lift with one hand (roughly 10–20 lb each, model dependent)
Model Notes (JL vs JK vs JT)
- Wrangler JL (2018+) and Gladiator JT: Rear wiper/defroster harness and washer hose quick‑disconnects are at the driver‑side rear, inside the cargo area. Slide the lock tab, press release, pull straight apart.
- Wrangler JK (2007–2018): Very similar layout. The connector and hose typically live at the driver‑side rear corner.
- Older TJ/YJ/CJ: One‑piece tops and hardware patterns differ. This guide focuses on JK/JL/JT. For TJ/YJ, confirm bolt counts/locations in your manual.
Pre‑Removal Checklist (don’t skip—this prevents damage)
- Remove Freedom Panels first (JK/JL/JT). Release all interior latches per your year’s manual.
- Open tailgate and rear glass to access bolts and connectors.
- Clear the cargo area. Fold second row for space.
- Take quick phone photos of wiring/hose routing and bolt locations.
- Turn off rear wiper and defroster before unplugging.
Method 1: Two‑Person Lift (step by step)
- Remove Freedom Panels
- Release and unlatch in order. Lift panels off and set on towels. They scratch easily.
- Unplug harness and hose
- Driver‑side rear, inside cargo area. Slide the lock tab, press the release, pull straight apart. Press the washer hose clip to release. Cap/tape the hose to stop drips. Tuck the loose harness so it won’t snag.
- Remove hardtop bolts
- Use T50. Typical 4‑door has three bolts per side along the tub rails. Some years have extra fasteners—visually check edges. Bag and label bolts.
- Lift the top
- One person at each rear corner. Count it out: “1‑2‑3‑lift.” Go straight up a few inches to clear alignment pins. Walk back together. Don’t drag on paint or shift side to side.
- Set it down safely
- Store upright on a padded stand or cart. Never on the rear glass. Keep seals clean and uncrushed.
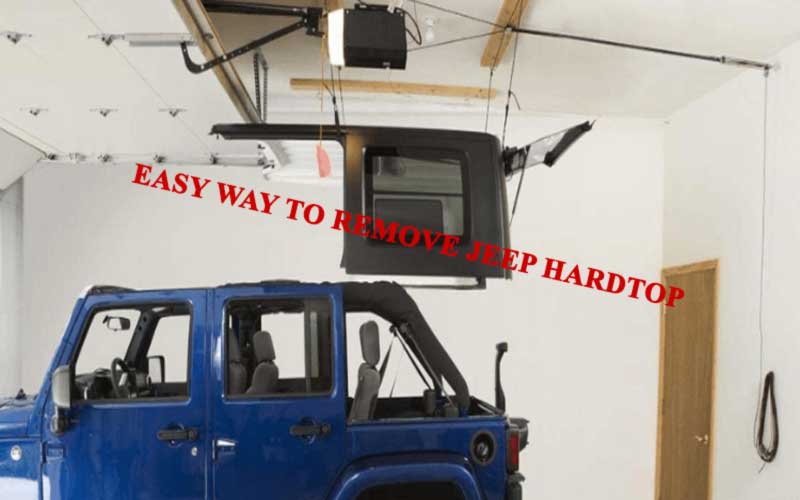
Method 2: Hoist Lift (ceiling or freestanding)
- Install a rated hoist per instructions. Anchor to ceiling joists or use a freestanding frame. Use wide straps under structure, not the glass.
- Steps:
- Remove Freedom Panels.
- Unplug harness/hose and remove bolts.
- Attach straps evenly; protect paint with towels.
- Lift slow until clear.
- Drive forward and park. Lift higher to store or roll the freestanding hoist away.
- Pro tip: Add foam around strap contact points to prevent rub marks.
Storage That Won’t Ruin Your Top
- Good
- Upright on a hardtop cart, padded sawhorses, or a wall stand
- Indoors, covered, off the floor
- Out of sun and heat to protect paint and seals
- Bad
- On the rear window (it will crack)
- Outside uncovered (UV and warping)
- Leaning with pressure on seals/edges
- Where kids/pets can bump it
Short‑term (days/weeks): cart, hoist, or padded stand.
Long‑term (months): climate‑controlled space, cover it, clean and condition seals, check monthly.
Reinstall Without Leaks
- Clean the tub rails and all seals. Dirt causes leaks.
- With helper/hoist, lower the top straight down. Align pins and edges.
- Hand‑start every T50 bolt before tightening any. Then snug evenly side‑to‑side. Do not overtighten. Use your owner’s manual for torque if you need numbers.
- Reconnect the harness and washer hose until they click/lock.
- Close rear glass and tailgate. Refit Freedom Panels and latch in order.
- Leak‑check: Light hose spray around seams/edges. Dry any drips and retighten evenly.
Solo Removal Options (when you’re on your own)
- Ceiling hoist (best): $200–600. Safe, repeatable, and fast if properly installed and rated.
- Freestanding hoist: No ceiling anchors; great for renters.
- DIY lever method (only if you must)
- Leave the front two bolts loosely threaded.
- Lift the rear slightly with a padded 2×4 as a lever and support with stands.
- Remove front bolts and slide the top to a cart.
- Note: Risky. One slip can crack glass or paint. I only recommend a hoist for solo work.
Common Mistakes That Cost Money
- “It’s not that heavy.” Drops happen. Rear glass: 400–400–600.
- Rushing bolt removal. Stripped inserts need repair.
- Ignoring wind. A gust can flip a top off supports.
- Bad storage. Sun and pressure flatten seals or warp panels.
- Yanking the harness. Broken connectors = splicing and headaches.
Care Tips (keep it easy)
- Clean seals with mild soap and water. Avoid petroleum products.
- Keep the washer hose capped during storage to reduce drips.
- Turn off rear wiper/defroster before unplugging; reconnect before you power them again.
Troubleshooting (fast fixes)
- Top “stuck” after bolts out: You missed a bolt or the seal is bonded. Check again. Use a plastic trim tool to break the seal—don’t pry metal on paint.
- Warning light after reinstall: Harness not fully seated. Turn Jeep off, reseat until it clicks, then cycle ignition.
- Water leaks at corners: Clean seals, reseat top, tighten bolts evenly, and confirm Freedom Panel latches are fully engaged.
- Rear glass won’t close smooth: Misalignment or a pinched seal. Lift and reseat.
- Washer not spraying: Hose not fully clicked or kinked. Reconnect and test.
Time & Cost
- Time: First time 30–60 min. After that 15–20 min. Solo with hoist ~30 min.
- Cost: Basic tools included with Jeep. Hoist/storage cart runs ~150–150–600. Worth it if you go topless often.
GEO Tips (U.S. climate advice)
- Sun Belt (AZ, NV, TX, FL): Store out of sun. Heat dries seals. Use a light cover.
- Snow states: Don’t set the top on cold concrete. Let seals warm to room temp before reinstalling.
- Coastal areas: Rinse salt off the hardtop and seals. Salt shortens seal life.
- Dusty regions: Cover the top even indoors. Dust grinds into seals and paint.
Printable Removal Checklist
- Jeep off; rear wiper/defroster off
- Freedom Panels removed and stored
- Tailgate/rear glass open
- Harness unplugged; washer hose disconnected and capped
- All T50 bolts removed and bagged
- Lifted straight up, then back—no twisting
- Stored upright on padded cart/stand, covered
Printable Reinstall Checklist
- Cleaned rails and seals
- Lowered straight down; pins aligned
- All bolts hand‑started; then snugged evenly
- Harness and washer hose fully clicked/locked
- Freedom Panels latched in order
- Hose leak‑check passed
Model‑Specific Quick Notes
- TJ/YJ one‑piece tops: Heavier and awkward. Often no wiper/defrost to unplug. Use two people or a hoist.
- JK (2007–2018): Modular three‑piece. Familiar T50 bolts. Take care around painted edges and sound bar.
- JL/JT (2018+): Easiest system. Nice quick‑disconnects. More interior trim near the connector—don’t force anything.
FAQs Related to Jeep Hardtop Hoist
- Can one person remove a Jeep hardtop?
With a rated hoist, yes. Without a hoist, I don’t recommend it. The shell is bulky and easy to drop. - Which Torx do I need for the hardtop?
T50 for the tub‑rail bolts. Your factory Mopar kit includes the correct bit. Freedom Panel latches do not need tools; some years have a small latch screw—check your manual. - Where is the wiring connector on JL/JK/JT?
Driver‑side rear inside the cargo area, just below the hardtop edge. Slide the lock tab, press the release, and pull straight apart. The washer hose sits next to it. - Will removing the top make it leak later?
Not if you clean seals, align carefully, and tighten bolts evenly. Most leaks come from dirty or pinched seals or uneven bolt snugging. - How much does a Jeep hardtop weigh?
2‑door rear shell ~90–120 lb. 4‑door rear shell ~120–150 lb. Gladiator ~130–170 lb. Freedom Panels are much lighter (about 10–20 lb each). - Do I need to disconnect the battery?
No. Just turn the Jeep off and switch off the rear wiper/defroster before unplugging. Reconnect everything, then power systems back on. - Can I drive with Freedom Panels off but the rear shell on?
Yes. Many owners do. Secure any loose items, and cap the washer hose if it drips. - What’s the best way to store the top?
Indoors, upright on a padded cart/stand. Cover it, keep seals clean, and keep it out of sun and heat. - How tight should I torque the bolts?
Hand‑snug evenly. Do not overtighten. If you want a number, use the spec in your owner’s manual for your exact model/year. - My washer doesn’t spray after reinstall—why?
The hose isn’t fully clicked or is kinked. Reconnect the quick‑connect and test. Also reseat the electrical connector. - I got a rear wiper fault on the dash—help?
The harness likely isn’t locked. Turn the Jeep off, click the connector fully, then restart.
Final Word
Respect the process. It’s not hard when you slow down and follow the steps. Use the right Torx, keep the seals clean, and either grab a friend or use a hoist. That first time I cracked a rear window? It happened because I rushed and tried to muscle it solo. Don’t be me.
Ready to go topless? Pick a calm day, print the checklist, and take your time. Questions about your exact year or hoist setup? Tell me your model (JL/JK/JT) and I’ll tailor a quick bolt map and storage plan for your garage.