“Don’t move. Don’t even breathe on it.” I was standing over my friend’s hood, watching him apply his first ceramic coating. The coating had just flashed, and we had maybe 30 seconds to level it perfectly. His hands were shaking. Mine were too – flashbacks to my first disaster six years ago when I turned a black BMW into a streaky mess that took eight hours to fix.
After 500+ ceramic coating applications in every condition imaginable – from perfect shop environments to that windy carport I still have nightmares about – I’ve learned every possible way to screw this up. And more importantly, how to get it right every single time.
Quick Answer (For the Impatient)
Here’s ceramic coating in 30 seconds:
- Prep: Wash → Decontaminate → Clay → Polish → Panel wipe (4-6 hours)
- Apply: Work 2×2 sections → Thin coat → Watch for rainbow → Level with microfiber (1-2 hours)
- Cure: Keep dry 24 hours → No washing 7 days → Full cure 30 days
- Maintain: pH-neutral wash → Dry completely → Optional topper monthly
But if you want to avoid my $600 mistakes, keep reading.
What You’ll Actually Need (The Truth)
Let me save you three trips to the store. Here’s everything, including the stuff nobody mentions:
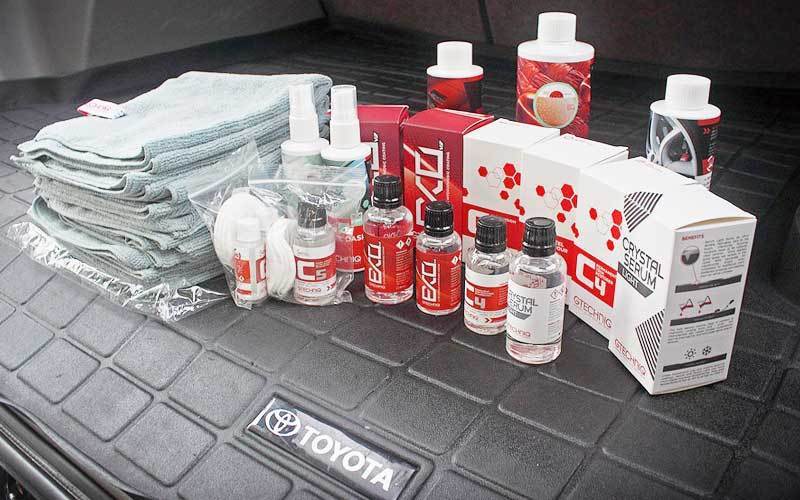
Essential Tools:
- Buckets: Two, with grit guards ($30)
- Microfibers: 20+ low-pile, edgeless ($40)
- Clay bar kit: Fine grade with lube ($25)
- LED work light: Trust me on this ($40)
- Masking tape: For trim ($5)
- Nitrile gloves: Box of 100 ($15)
Chemicals You Can’t Skip:
- Strip wash: Dawn dish soap works ($3)
- Iron remover: CarPro IronX or similar ($20)
- Polish: At least finishing polish ($25)
- Panel wipe: Or 70% IPA ($15)
- Ceramic coating: 50ml minimum ($50-150)
The “Nice to Have” List:
- DA polisher: Game changer ($150)
- Infrared thermometer: Know panel temps ($25)
- Coating applicators: Better than included ($20)
- Drying aid: Speeds process ($15)
Real total cost: $250-400 for first time (you’ll reuse most)
Phase 1: Preparation (Where Success Lives or Dies)
Picture this: I’m watching someone apply $150 coating over dirty paint. It’s like putting a screen protector over a cracked phone screen. Here’s how to prep like your coating depends on it – because it does.
Step 1: The Strip Wash
Forget your fancy wax-infused shampoo. We’re going nuclear.
- Fill bucket with warm water
- Add 2-3 oz Dawn (yes, the duck soap)
- Wash panel by panel – roof to rockers
- Rinse immediately after each panel
- Feel the paint – should feel grabby, not slick
Why this matters: Any wax or sealant left behind creates a barrier. Your coating won’t bond, and you’ll have failure in weeks, not years.
Step 2: Chemical Decontamination
This is where we get scientific. Your paint has embedded iron particles you can’t see.
- Cool the car in shade (never on hot panels)
- Spray iron remover liberally on all panels
- Wait 3-5 minutes – watch it turn purple
- Agitate gently with damp microfiber
- Rinse thoroughly – smell should be gone
Pro tip: If it doesn’t turn purple anywhere, you either have incredibly clean paint or a bad bottle of iron remover.
Step 3: Clay Bar (The Game Changer)
Even “clean” paint feels rough. Clay bar is like an eraser for your paint.
- Knead clay until soft and pliable
- Spray section with clay lube (lots)
- Glide clay with zero pressure
- Listen and feel – roughness disappears
- Fold clay when dirty (every 2-3 panels)
What you’ll find: The clay will look disgusting. That contamination was embedded in your paint.
Step 4: Polish (Non-Negotiable)
“But my paint looks good!” I hear this weekly. Here’s the truth: ceramic coating is like a magnifying glass. Every swirl, every water spot, every imperfection becomes more visible.
By Hand Method:
- Work 1×1 sections with applicator pad
- Apply polish size of a dime
- Work in straight lines overlapping 50%
- Remove before drying with clean microfiber
- Inspect with LED at multiple angles
Machine Method (Better):
- Start with finishing pad and polish
- Speed 4-5 on DA polisher
- Work 2×2 sections slowly
- 4-6 passes overlapping 50%
- Keep pad flat and moving
Time investment: 2-4 hours by hand, 1-2 hours by machine
Step 5: Panel Wipe (The Final Frontier)
This removes polishing oils that would prevent bonding. Skip this and your coating fails. Period.
- Fold microfiber into quarters
- Spray panel wipe on towel (not panel)
- Wipe in straight lines with light pressure
- Follow immediately with dry microfiber
- Work in sections – don’t let it dry
The test: Spray water on panel. It should sheet off completely, not bead. If it beads, wipe again.
Step 6: Final Setup
Now we protect what we don’t want coated.
- Tape off rubber trim and plastics
- Close all gaps – hood, doors, trunk
- Position lighting to see every angle
- Lay out supplies within arm’s reach
- Put on gloves – oils from skin matter
Environment check:
- Temperature: 55-80°F (ideal 65-75°F)
- Humidity: Under 70%
- No wind or dust
- Good lighting essential
Phase 2: Application (Where Magic Happens)
Okay, deep breath. You’ve spent hours prepping. Now comes the fun part – if you know what you’re doing.
Understanding Flash Time
This is THE critical concept. Flash time is when the coating is ready to level. Too early = no protection. Too late = permanent high spots.
Visual cues to watch for:
- Rainbow oil-slick appearance
- Slight haziness forms
- Surface looks “wet” but not liquid
- Coating starts to grab slightly
Testing flash time:
- Apply to small test spot
- Start timer
- Every 30 seconds, swipe edge with microfiber
- When it wipes clean without smearing, that’s your time
- Remember this timing for whole car
The Application Dance
Picture me standing next to you, guiding every move:
- Prime the applicator
- Add 4-6 drops to suede
- Work into applicator evenly
- Should feel damp, not soaked
- Choose your section
- 2×2 feet maximum (smaller if hot)
- Start with horizontal panels
- Work systematically
- Apply the coating
- Crosshatch pattern always
- Horizontal passes first
- Then vertical passes
- Light pressure – let coating do work
- Overlap 30-50%
- Watch like a hawk
- Set phone timer if needed
- Look for rainbow effect
- Check from multiple angles
- Don’t get distracted
- The level and buff
- First towel: gentle straight lines
- Remove all residue
- Second towel: final buff
- Should be crystal clear
- Check with LED light
Climate-Specific Timing
Cool & Dry (60-70°F, <50% humidity):
- Flash time: 60-90 seconds
- Work normal 2×2 sections
- Coating flows nicely
- Most forgiving conditions
Warm & Humid (75-85°F, >60% humidity):
- Flash time: 15-30 seconds
- Work 1×1 sections maximum
- Have 20+ towels ready
- Move FAST
- Consider waiting for better conditions
Perfect Conditions (65-75°F, 40-60% humidity):
- Flash time: 45-60 seconds
- Ideal for beginners
- Coating behaves predictably
- Best results
Common Application Mistakes I See
- The “More is Better” Guy:
Dumps half the bottle on one car. Results in runs, high spots, and waste.
Fix: 4-6 drops per section, period. - The “Speed Demon”:
Tries to coat entire side before leveling. Coating dries, high spots everywhere.
Fix: One section at a time, always. - The “It Looks Fine” Person:
Doesn’t use proper lighting. Misses spots and high spots.
Fix: LED light at multiple angles after each section.
Phase 3: Curing (Patience Required)
The coating is on, but we’re not done. Think of curing like concrete – it might feel hard, but it needs time to reach full strength.
First 24 Hours (Critical)
- No water whatsoever
- Don’t touch panels
- Keep indoors if possible
- No driving unless necessary
- Monitor temperature – keep above 50°F
What’s happening: Solvents evaporating, coating bonding to clear coat
Days 2-7 (Building Strength)
- Light moisture okay after 48 hours
- No washing still
- Gentle driving acceptable
- Avoid harsh conditions
- Check for issues daily
What’s happening: Chemical cross-linking strengthening
Days 7-30 (Final Cure)
- First wash after day 7 (gentle!)
- Normal use but stay careful
- Full hardness by day 30
- Chemical resistance developing
What’s happening: Reaching rated hardness and full properties
Accelerating Cure (Advanced)
- Infrared lamps: Reduces initial cure 50%
- Controlled heat: 100-120°F speeds process
- Low humidity: Helps solvents escape
- Air movement: Gentle circulation helps
Phase 4: Maintenance (Keeping It Alive)
Your coating is cured. Now let’s keep it performing for years, not months.
The First Wash (Day 7+)
This is nerve-wracking. You’ve waited a week. Don’t blow it now.
- Rinse thoroughly first
- Use pH-neutral shampoo only
- Two-bucket method mandatory
- Soft wash mitt – no brushes
- Dry immediately with clean towels
What to expect: Water behavior should be incredible. Tight beading, easy cleaning.
Regular Maintenance Schedule
Weekly:
- Quick rinse if dirty
- Bird dropping removal (immediately)
- Visual inspection
Bi-Weekly:
- Full two-bucket wash
- Dry completely
- Check all panels
Monthly:
- Decontamination if needed
- Apply SiO2 topper (optional)
- Detailed inspection
Quarterly:
- Clay bar if contaminated
- Machine polish if needed
- Reapply topper
Products That Help
- pH-neutral shampoo: CarPro Reset, Gtechniq G-Wash
- Drying aid: P&S Bead Maker, Griot’s Speed Shine
- Toppers: CarPro Reload, Gyeon Cure
- Decon: CarPro IronX, Gtechniq W6
Products That Hurt
- Dish soap (post-coating)
- Automatic car washes
- Harsh degreasers
- Wax or sealants (not needed)
Troubleshooting Guide
High Spots (Dark Marks)
If caught within 1 hour:
- Apply tiny amount of coating
- Work it in thoroughly
- Level immediately
- Crisis averted
If caught within 24 hours:
- Try leveling with damp microfiber
- Use distilled water only
- May need light polish
If caught after 24 hours:
- Polish required
- Compound if severe
- Reapply coating to area
Streaking/Smearing
Causes:
- Too much product
- Contaminated towels
- Wrong temperature
- Waited too long
Fixes:
- Less product
- Fresh towels constantly
- Control environment
- Work faster/smaller
Water Spots During Cure
Prevention: Keep dry for 24 hours minimum
If it happens:
- Blot gently (don’t wipe)
- Let dry naturally
- After full cure, use spot remover
- May need polish if etched
Special Surface Considerations
Plastic Trim
- Most paint coatings stain trim
- Use dedicated trim coating
- Or carefully tape everything
Wheels
- Clean wheels can use paint coating
- Brake dust requires frequent cleaning
- Consider wheel-specific coating
Glass
- Needs glass-specific coating
- Paint coatings cause wiper issues
- Different application process
Matte/Satin Paint
- NEVER use gloss coating
- Matte-specific products only
- No polishing ever
Time and Cost Reality Check
Realistic Time Investment:
- New car, minimal prep: 4-6 hours
- Daily driver, average: 6-10 hours
- Neglected paint: 10-15 hours
- Spread over 2 days: Recommended
True Cost Breakdown:
First Time:
- All supplies: $250-400
- Coating: $50-150
- Total: $300-550
Future Applications:
- Just coating: $50-150
- Replacement supplies: $50
- Total: $100-200
Vs Professional:
- Pro installation: $500-2000
- Includes warranty
- Perfect results expected
- Your time saved
Climate-Specific Tips (US Regions)
Southeast (Hot & Humid)
- Work before 8 AM only
- AC in garage mandatory
- 1×1 sections maximum
- 30+ microfibers needed
- Consider waiting for fall
Southwest (Hot & Dry)
- Shade absolutely required
- Mist air (not car) for humidity
- Morning application only
- Watch for instant flash
- Panel temperature critical
Northeast/Midwest (Variable)
- Spring/fall ideal
- Heated garage in winter
- Watch humidity swings
- Allow extra cure time
- Salt exposure needs more maintenance
Pacific Northwest (Cool & Wet)
- Dehumidifier helpful
- Extended cure times
- More frequent maintenance
- Great for application
- Watch for constant moisture
My Personal Checklist (Print This)
Prep Day:
□ Wash with strip soap
□ Iron decontamination
□ Clay bar all panels
□ Polish (at least finishing)
□ Panel wipe thoroughly
□ Tape trim/plastics
□ Set up workspace
□ Check weather forecast
Application Day:
□ Verify temperature/humidity
□ Test flash timing
□ Work systematically
□ Check each section with light
□ Keep towels organized
□ Stay focused (no phone!)
□ Final inspection
□ Document with photos
Post-Application:
□ Keep dry 24 hours
□ No washing 7 days
□ Schedule first wash
□ Plan maintenance routine
FAQs Related to Applying Ceramic Coating
Q: How long does ceramic coating take to apply?
A: Plan 8-12 hours total: 2-3 hours decontamination, 2-4 hours paint correction, 1 hour final prep, 1-2 hours application, plus drying time between steps.
Q: Can I apply ceramic coating outside?
A: Not recommended. You need controlled temperature (55-80°F), no wind, no sun, and no chance of rain for 24 hours. Garage is strongly preferred.
Q: Do I need to polish before ceramic coating?
A: Highly recommended. Ceramic coating enhances everything underneath – including scratches and swirls. At minimum, use a finishing polish to enhance gloss.
Q: How long before I can wash my car after coating?
A: Wait minimum 7 days for first wash. Use only pH-neutral shampoo and gentle technique. Full cure takes up to 30 days.
Q: Can I apply ceramic coating over wax or sealant?
A: No. All previous protection must be completely removed. Use dish soap and/or panel wipe to ensure bare paint for proper bonding.
Q: What happens if it rains after application?
A: Within 24 hours: Potential spotting or coating failure. 24-48 hours: Water spots likely. After 48 hours: Usually safe but avoid if possible.
Q: How many coats should I apply?
A: Most consumer coatings: one coat only. Some allow two coats with specific wait times. More isn’t better – follow manufacturer instructions.
Q: Can I ceramic coat plastic trim and glass?
A: Use dedicated products. Paint coatings can stain trim and may not bond properly to glass. Specific formulations exist for these surfaces.
Q: Why did my coating fail after 3 months?
A: Usually improper prep (90% of failures), wrong application conditions, or harsh maintenance. Proper prep and pH-neutral washing are critical.
Q: Is ceramic coating worth it for daily drivers?
A: Yes. Daily drivers benefit most from easier cleaning and protection. Garage queens don’t see enough contamination to justify the cost.
The Bottom Line
After 500+ ceramic coating applications, I can tell you this: success is 70% preparation, 20% application technique, and 10% maintenance. Rush any part and you’ll join the frustrated folks wondering why their coating failed.


This is an amazing and easy method to coating on car. I’m looking for this kind of helpful information. This information will help me a lot. I did put on my car ceramic coat myself. But it wasn’t so beautiful. I will follow this method to coat again. Thanks a lot.
I am glad that you clarified that we don’t need to put on a wax coating before the ceramic coating. We knew that we needed the car to be clean and polished, but we weren’t sure if that included a layer of wax. I didn’t know that the ceramic paint would bond with the wax instead of the surface of the car if we did that. Thanks for the clarification and tip on ceramic painting