How to Change A Fuel Pump – Step By Step Guide Line
You might have ignored these signs. Your car engine stuttered or surged. Over the course of weeks, fuel efficiency dropped. You might also have heard high-pitched noises, and then one day, the engine wouldn’t start only to spoil the perfect day of yours.
Many possibilities are there, but the strongest one is that the fuel pump isn’t okay and that you have to replace it.
Is it too demanding like most car repair jobs? Well, it’s a lot to handle but not back-breaking. This article discusses how to change a fuel pump detailing everything so that you don’t have to feel confused or lost.
How to Change a Fuel Pump?
The job involves five different phases. First, you should relieve the system of the existing pressure inside. Then, you must remove the pump that you want to replace. Then, finish with the installation of the new one. So, let’s start now.
Phase: 1 Prepare for the Job
You’ve certain things to consider before you find yourself in a good position to start.
Preparing the Budget
Many vehicle owners count more on certified auto mechanics than on themselves, and choosing who will handle the job is an important determiner of the cost.
The cost of replacement can be $400-$600 including the cost of the required labor and parts. If you do it alone, the only cost involved in it is the price of the fuel pump which is around $200 excluding the different work tools you’ll need throughout the procedure.
Choosing a Location
- Pick up a spot that offers good ventilation.
- It should provide enough room to allow you to move around the vehicle as needed.
- It has a level surface.
Taking Safety Measures
- Keep a fire extinguisher within your reach.
- Avoid working with appliances like water heaters, dryers, grills, etc.
- Don’t smoke anywhere near your fuel tank.
- Use work clothes, especially the ones that protect your eyes, hands, and other body parts from fuel spills.
Considering Other Factors
- With a vehicle that features an ARC system (Automatic Ride Control), you must turn its air suspension switch off before lifting the vehicle.
- Purchase a fuel pump checking with your vehicle’s make, year, and VIN number so that the electrical connections and fuel line match perfectly.
- Get a complete fuel pump module if finding the different parts seems challenging.
Read More: Tips for Starting a Car with Bad Fuel Pump
Phase: 2 Gather the Tools
Have the following items together before you start. You may also need some replacement parts which aren’t included here.
- Replacement Fuel Pump
- Jack with Jack Stands
- (Ratchet) Wrench or Socket set
- Pliers and Screwdrivers
- Bolt and Wooden Dowel
- Wooden Block
- Gasoline Container
- Shop Rags
- Hand-Siphon Vacuum Pump
- Vehicle-Specific Owner Manual
Phase: 3 Depressurize the Fuel System
The majority of modern automobiles use a special fuel injection system designed to work under high pressure and ensure the supply of the correct mixture of air and fuel to the engine cylinders.
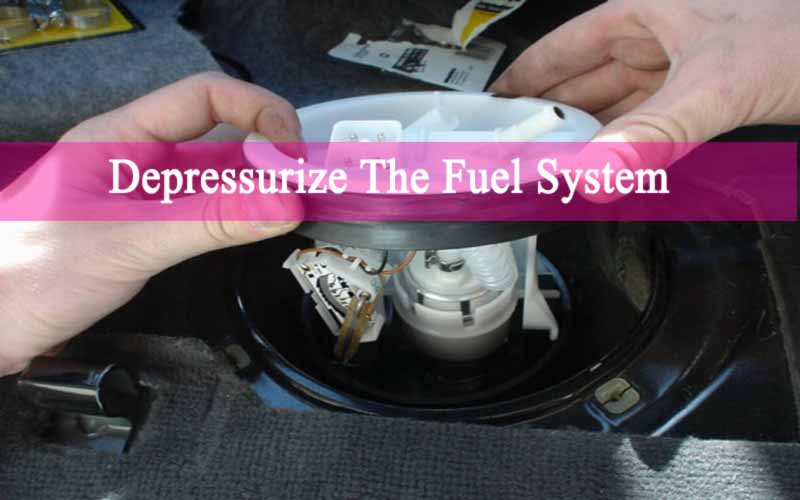
Depressurize the Fuel System
So, before doing any kind of maintenance on it, the pressure that might exist there even after the engine is stopped has to be removed. By not doing this, you’ll only risk having some of the remaining fuel all over your body.
There’re five ways to perform the task depending on your car brand, fuel system, and manufacturer’s guidelines. We’ll discuss all of them precisely.
Using the Fuel Pressure Regulator
- Use a wrench to disconnect the battery cable that is marked negative. It’ll help you avert sparks which might lead to an unwanted ignition of fuel or vapors.
- Reach the engine’s top area to find the fuel rail where the regulator can be located.
- Located the vacuum hose mounted on the regulator’s top part. Remove the hose.
- Bring a hand-operated/ manual vacuum pump and connect it to the regulator’s top.
- Apply up to 16 inches of Hg (atmospheric pressure) to the regulator. It should be adequate to push whatever is left in the lines right back into the tank.
Read More: Symptoms of Weak Fuel Pump
Using the Fuel Pump Connector
You need to access the fuel tank’s pump assembly or sending unit. Different vehicles have it in different places, and there’re three known positions.
Some models have the access point above the fuel tank. Having such a vehicle, you may want to pull the trim on the trunk’s floor off or pull and lift the retaining strap on your seat’s back to take out the rear seat. Some have it right through the floor or plain under the trunk trip or underneath the car’s rear seat.
For finding the point on a few other models, you may need to use a floor jack to raise the vehicle’s rear and a couple of jack stands to support it. Once the access point has been within your grasp, you have to proceed this way.
- Use a Phillips screwdriver to remove the butyl tape around that access point or the mounting screws on it.
- There’s an electrical connector on the assembly or sending unit of the fuel pump. Unplug it carefully.
- Start the vehicle’s engine. Allow it to remain idle as long as it starts stalling. Kill the ignition switch.
- Disconnect the battery cable that’s marked negative.
Using the Fuse and Relay
- Identify the location of the fuel pump fuse. It’s close to where the driver sits, either in the engine compartment or under the dashboard. Use the manual if required.
- Use pliers or your hands to remove the fuse and relay.
- Start the car engine and leave it idle up to the time it takes to stall.
- Use a wrench to disconnect the negative (−) battery cable.
Using the Inertia Switch (Mostly Available with Ford Models)
Locate the inertia switch that should be under the dashboard or around the rear compartment or trunk. Many models, especially Ford vehicles, use the switch to stop the fuel supply in the event of an accident.
- Check the user manual to find its location.
- The switch uses an electrical connector. Unplug it.
- Start your engine and allow it to run till the time it stalls.
- Disconnect the negative (−) battery cable.
Using the Test-Port Valve
- Start by disconnecting the (−) battery cable.
- Find the Schrader valve. Fuel-injected models have it on the fuel rail located around the engine’s top. Other models include the valve merely for test tasks.
- If the valve uses a cap, unscrew it.
- Use shop rags around that valve to contain the fuel squirt that may come out.
- Use a screwdriver to push that valve in. keep doing this until the flow of fuel through the valve stops.
- Replace the cap of the test-port valve.
Now that you’ve managed to depressurize the fuel system, the pressure existing inside the fuel tank should also be removed by taking out the fuel filler neck cap. Only after these steps, you can get started with the fuel pump.
Phase: 4 Remove the Old Pump
You’ve to complete this task following different stages, such as removing the fuel tank, disconnecting hoses and connectors, and removing the fuel sending assembly.
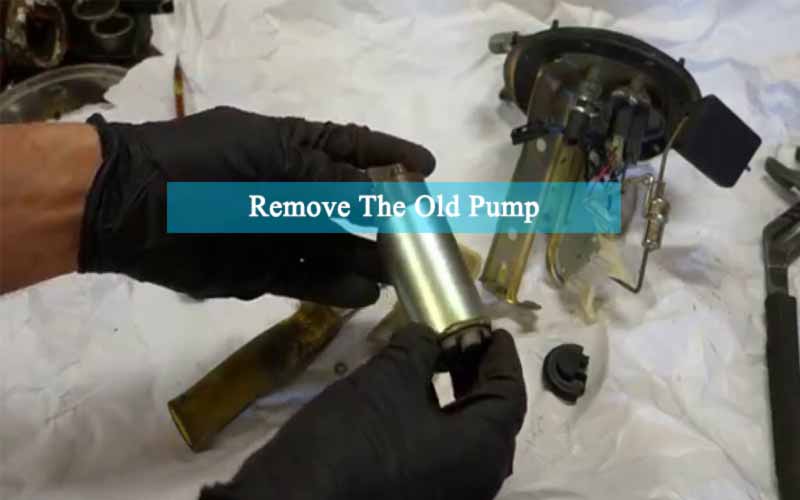
Remove The Old Pump
Removing the Fuel Tank
It’s important that you know where the fuel tank rests. You may find the tank at the rear, under the vehicle, behind a body panel, or under the rear seat. Check your vehicle car owner’s manual or repair manual, if necessary.
You’ll see two kinds of pumps. One is housed inside the fuel tank while another is located beneath the vehicle being held by bolts. You may slide under your car to find the pump. You can also jack up and support it using jack stands. Use wooden blocks to prevent the front wheels from rolling towards any direction.
Make sure no components interfere as you start working on the fuel tank. Put a floor jack right under the tank. Then, keep a sturdy piece of wood between the tank and the jack saddle to save the tank from damages.
Raise your jack as much as required to keep the saddle against the tank. Two straps secured by several bolts hold the fuel tank. Use a ratchet that has a long extension or a swivel joint to reach and unbolt the bolts.
Some models don’t require the removal of the tank from the setup. With such a car, you can move onto the next steps without bothering about this one.
Disconnecting the Fuel Hoses and Electrical Connector
Now, you should be able to disconnect the fuel lines or hoses from the tank. You can reach the hoses/lines by lowering the tank only a few inches. If that’s not an option, bring a tool that’s specifically designed to separate the fuel hoses.
Make sure you use mask tape to tag each line or hose before disconnecting them because you don’t want to have trouble reconnecting them.
It’s time for you to separate the electrical connector that powers your car’s fuel pump. Be careful about the locking tabs that keep the connector in its place. They might be too fragile to be handled without caution.
Use clean plastic to cover the hoses and connector and secure them using a rubber band. This little work will help prevent contamination to those components.
Disassembling the Fuel Sending Unit
On some models, the task is as easy as lowering the tank slightly and then removing the fuel sending or pump assembly. On others, you’ll follow a set of activities.
A cam lock ring secures the fuel sending unit to the fuel tank. Unscrew that ring first. Use a wooden dowel or a brass punch to avert unnecessary sparks. A screwdriver can also be an option, but use a shop rag in between the lock ring tabs and the screwdriver for protection against sparks.
The lock ring must be rotated counterclockwise for a quick release. If the fuel pump of your car is secured by some bolts, unscrew them one by one. Once the module has been removed, perform some cleaning on the top bracket to keep it free of contamination.
With the ring removed, you should try and lift the sending unit set up slowly. You’ll notice a rubber ring or seal around the fuel tank opening underneath the mounting bracket of the sending assembly. Get rid of that seal and bring a new one.
Lift the sending unit carefully out of the fuel tank maintaining an angle. This way, the wire arm that secures the fuel level float can clear the tank opening without causing any damage to the electrical system connected to that long arm.
The long arm typically points to a single position which is the only place the sending unit should rest. So, follow that arm’s direction.
Phase: 5 Install the New Pump
By this time, you’ll have the vehicle without a fuel pump. So, install a new one by taking the following 15 steps.
- Place the pump assembly on a clean workbench.
- Examine each hose, electrical connection and wiring, and the overall condition thoroughly. Replace the faulty or broken part(s) or the entire assembly if required.
- Disconnect the pump’s bottom bracket, electrical wires, strainer, and outlet hose to detach the pump correctly.
- Place the replacement pump in that assembly.
- Reconnect everything that you disconnected a few moments ago.
- Use pressurized water to clean the tank from inside. Let it completely dry.
- Use carburetor cleaner to clean the tank opening prior to putting the rubber seal or O-ring back.
- Install the entire assembly having the new pump inside the tank and a seal gasket. Apply petroleum jelly to the rubber seal bottom so that it stays secured in its place as the fuel sending unit is locked onto the fuel tank.
- Use a chisel to rotate the cam ring clockwise and lock it in place.
- Lift the tank using the floor jack and reconnect the sending unit, fuel lines, filler neck, and the electrical connector to fuel tank.
- Place the tank into its position without any squeeze or damage to the connector and fuel lines.
- Attach the straps or mounting bolts to secure the fuel tank.
- Install the access point and connect the “negative” cable again to the battery.
- Start your car and inspect carefully for leaks.
- Refill the fuel tank with as much gasoline (one-fourth of the tank’s capacity) required to cover the newly installed pump.
So, you’ve understood how to change a fuel pump, and now the only thing left to know is how to change an external or inline pump. Well, it’s not as detailed as an in-tank pump.
An inline pump sits inside your car’s engine compartment. Some models have it close to the tank. Either way, you need not access the tank like you do in case of an in-tank pump.
Conclusion
Last but not the least, you should always keep the tank full with fuel up to one-fourth of its capacity. Anything less than this won’t keep your pump cool as you drive. Eventually, the pump will be stressed only to require a replacement sooner than you think, and needless to say, you’ll be going through all these over and over again.